Friday, December 23, 2011
Portland, OR
I just wanted to pop in to say that I'm moving to Portland, OR next Thursday, so I probably won't be able to post until at least January 3 (my move-in date). Happy Holidays!
Thursday, December 15, 2011
Arkansas Temporary Tattoos
My pal Britt Hallmark of Postmodern Press is now selling Arkansas-shaped temporary tattoos on her new etsy shop! I should get some to show my Arkansas pride since I'm moving to Portland in...TWO WEEKS!!!
Monday, December 12, 2011
new tumblr blog
I've started a new tumblr blog. I'm still going to use this blog as my main workspace for DIYs and updates. I'm using tumblr as my portfolio, as I keep looking for jobs in Portland, OR over the next few weeks/months. So check out ldkemp.tumblr.com for a cleaner, simpler version of what you see here, but for DIY tutorials and etsy posts, keep checking here.
Thursday, December 8, 2011
more lookbook pics!

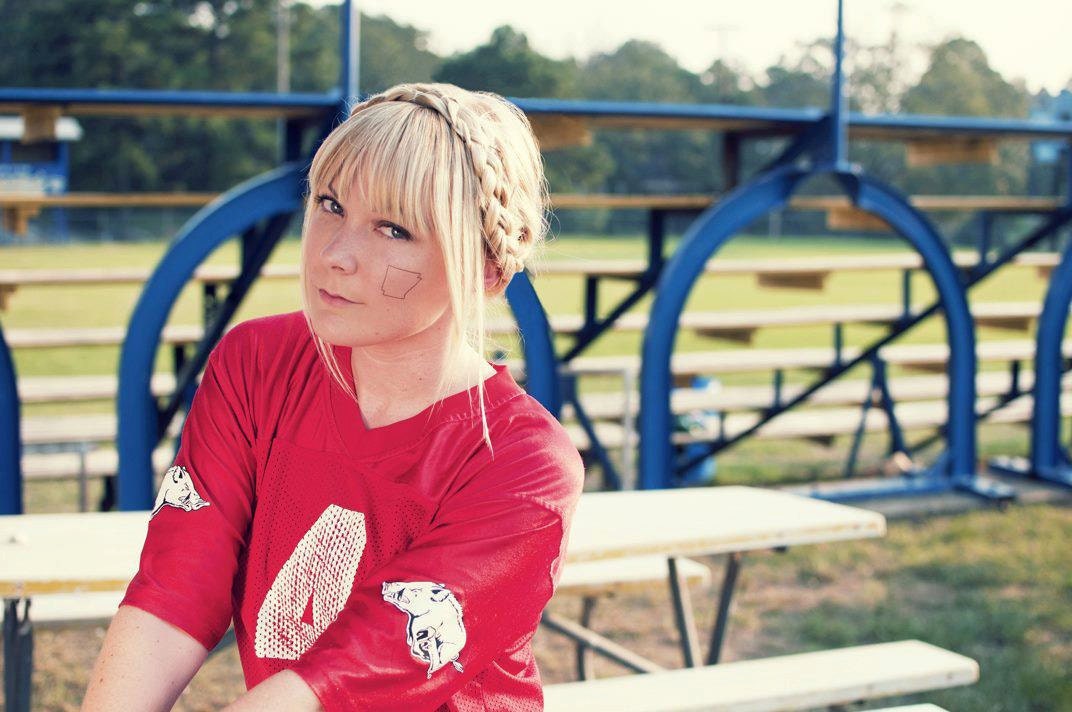
A few weeks ago, Starr (from the blog A Thought Is the Blossom) and Heather Canterbury and I had a photo shoot for the lookbook of my most recent collection. They are both busy women of course, so the photos have been trickling in a few at a time. Here's Katy Tipton wearing a criss-cross cut-out polka dot dress that I designed and made for my runway show a couple of months ago. The dress is currently on sale at Box Turtle in Little Rock, but as I will be moving to Portland in a few weeks (yay!), it will soon be for sale at my etsy store.

You can see the photos on A Thought Is The Blossom. Also, Calivintage posted one of the photos on her bikes + babes tumblr blog! I can't wait to see more pictures; they have all looked so amazing so far!

Tuesday, December 6, 2011
3 etsy posts: 12/6/11
I posted the following 3 items to my etsy store today. The skirt and the dress were created for a previous collection and runway show, and I'm just now getting around to posting them. The painting on the dress was done by my good friend Jenn Eakin, an amazing artist who now lives in New York City.


 |
| painting by Jenn Eakin |
Friday, December 2, 2011
2 etsy posts: 12/2/11
Besides the hand-painted tribal tee in the previous post, I also posted 2 other items to my etsy store today.
 |
| 1970s fair isle sweater cape |
 |
| DIY: I shredded and studded this crop top (which used to be a frumpy dress) |
DIY: hand-painted tribal T-shirt (on etsy)
Here I was about to donate this great 1990s cream-colored mesh T-shirt, then I realized I could paint the opaque cotton portion in the front. I decided to paint tribal-looking hash marks, alternating between thick and thin marks. I used black fabric paint from Hobby Lobby, and a thin paintbrush I happened to have. It took about 3 hours, but the time flew since I was watching a film (of course). It's relatively simple; I just eyeballed it as I went along. This is currently for sale on my etsy store.


Thursday, December 1, 2011
DIY: shredding a T-shirt I made
I originally made this T-shirt to go in my Fall 2011 runway show but I didn't have room for it. Plus it was a little blah. Over the weekend, I shredded the back of it. (I learned how to shred T-shirts via a tutorial video by Childhood Flames on youtube.) This took roughly 4 hours, but I watched almost all of season 2 of Flight of the Conchords, so the time flew. I may still hand-paint the front or something. I probably won't sell this on my etsy store, but I'll give you a heads up if I do.


Wednesday, November 30, 2011
DIY: detachable collar
Easy-as-pie DIY. Take a not-so-lovely button-up shirt that you won't mind cutting up, which (despite itself) has a lovely collar. I chose a large boring lavender cotton button-up shirt. Make sure it has a collar band with a button on it! Cut off the collar below the collar band. Dunzo. You could also stud it, paint it, etc.


The night I made this I wore it with a black blazer, a slouchy T-shirt, jeans, beret, and boots, and it looked great! Sorry I never post outfit pics; I don't have a camera besides my iphone (yet).


The night I made this I wore it with a black blazer, a slouchy T-shirt, jeans, beret, and boots, and it looked great! Sorry I never post outfit pics; I don't have a camera besides my iphone (yet).
Tuesday, November 29, 2011
DIY: fringe


And of course the top and the fringe don't have to be monochromatic; different colors would be interesting. Now I'm starting to wonder if I could dye fringe. Hmmm.
Wednesday, November 23, 2011
4 etsy posts: 11/23/11
These are items I added to my etsy store today.


 |
| DIY necklace made from rope and spray-painted wooden beads. |
Tuesday, November 22, 2011
3 etsy posts (plus DIY jewelry)
I just posted 3 items on my etsy store, Magpie & Birdie. Two of the items are necklaces I made for my Fall 2011 collection.
 |
| DIY necklace #1: rope, twine, yarn, and brass hex nuts |
 |
| black sequin slouch top |
 |
| DIY necklace #2: rope, wooden beads, and brass hex nuts |
DIY: studded jacket (plus etsy post)

I've been wanting to add studs to a jacket lapel for some time now, and I finally did it! This is one of the simplest DIY tutorials ever. 1.) Buy 1 or 2 bags of studs at Hobby Lobby, or wherever you can find them. 2.) Add them to the lapel of a simple blazer, using small scissors to help poke holes in the fabric. Dunzo! This jacket is available on my etsy store.

Monday, November 21, 2011
DIY: fabric paint (plus 2 etsy posts)
Project #1: Cat Print Top
- solid, cottony top
- black fabric paint
- homemade cat stencil
- spongy paintbrush
- blowdryer (optional)

- I ironed the solid light blue cottony top that I was going to use. It had a front pocket, which I removed.
- I made a makeshift cat stencil by cutting out a cat head shape on a plastic ziploc bag, and securing the edges with masking tape. I guess I could have used cardstock, but I thought it might get soggy. I think Hobby Lobby even has plastic sheets you can create stencils with using an exacto knife.
- I just eyeballed the layout of the print and started stenciling away with black fabric paint from Hobby Lobby.

4. I suggest putting a magazine or something inside the shirt so the paint doesn't seep through. I used a blowdryer sometimes to speed up the process.
5. After the front side dried, I painted the back side the same way. (Don't forget about the paint seeping through! Use that magazine!)

Project #2: Triangle Tank Top
- solid, cottony tank top
- white & grey fabric paint
- masking tape
- spongy paintbrush
- blowdryer (optional)
- measuring tape or ruler

- I ironed the solid turquoise cottony tank top that I was going to use. It had a square applique on the front, which I removed.
- I used masking tape to create the triangles I would paint in. I used a measuring tape (well, and a marked off post-it as you can see in the photo) to make sure they were all roughly the same size.

3. I used white fabric paint from Hobby Lobby for the top 2 rows. For the last row I made some light grey paint from white and black fabric paint.

There will be smudges and imperfections, but that's the beauty of it!
Sunday, November 20, 2011

Saturday, November 19, 2011
DIY: Hand-embroidery
This is half an etsy post, half a DIY post. I just posted a re-purposed skirt on my etsy store.
It was once a long slate blue pleated skirt. I know, everyone's going nuts for long skirts, but the fabric wasn't right for a long skirt. Plus, I still love knee-length skirts, so I hemmed it by about a foot. I did this project awhile ago, so if I had it to do over, I would probably dip-dye the hem (heck, I may still do that if it doesn't sell on etsy this go-around). But at the time, I was all about embroidery and scallops. I chose black embroidery thread so it'd stand out. I stitched along the side of a few of the front pleats and stitched two rows of scallops along the front waistband. (I suggest first figuring out how many scallops you want, then putting stick pins in the fabric to represent the scallops' width, because it's hard to just eyeball it.)
 You could put a plain row of stitches or a scallop detail on cuffs, necklines, waistbands, hems, pockets, etc. Or you could get more creative with your embroidery. Obviously, these are wall hangings, not clothing, but you get the idea.

It was once a long slate blue pleated skirt. I know, everyone's going nuts for long skirts, but the fabric wasn't right for a long skirt. Plus, I still love knee-length skirts, so I hemmed it by about a foot. I did this project awhile ago, so if I had it to do over, I would probably dip-dye the hem (heck, I may still do that if it doesn't sell on etsy this go-around). But at the time, I was all about embroidery and scallops. I chose black embroidery thread so it'd stand out. I stitched along the side of a few of the front pleats and stitched two rows of scallops along the front waistband. (I suggest first figuring out how many scallops you want, then putting stick pins in the fabric to represent the scallops' width, because it's hard to just eyeball it.)

 | |||||
| from the etsy store merri weather council |
 | |||||||||||||||||||||||||||||||||||||||||||||||||||||||||||||||||||||
| from the etsy store it's a stitch |
Friday, November 18, 2011
3 Etsy Posts: 11/18/11
I just posted 3 things on my etsy store, including my DIY shredded sweater from the other day and an Oleg Cassini coat!


Thursday, November 17, 2011


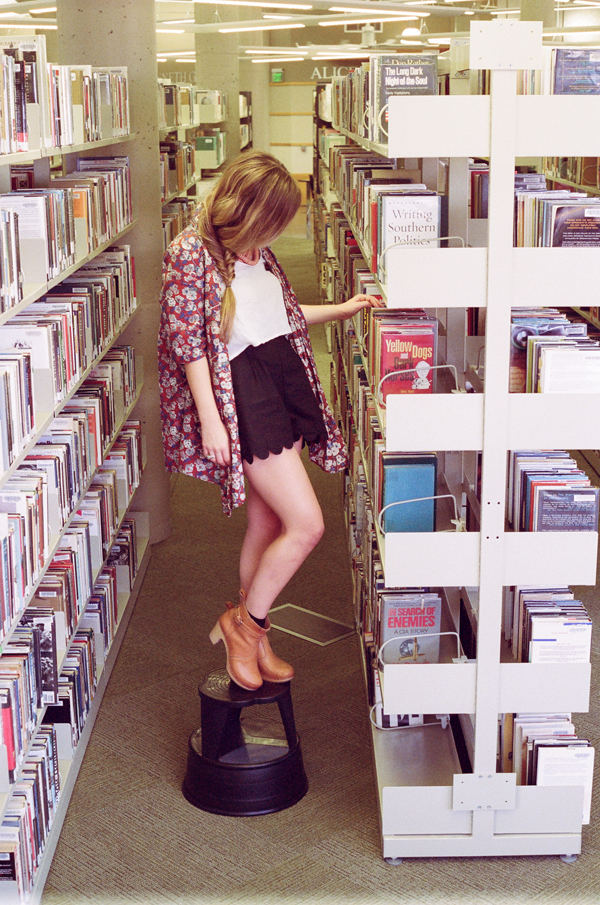
Fall 2011 Lookbook Photos by Starr Crow (Part II)
Starr, from A Thought Is The Blossom, posted some more photos from our shoot a couple of weeks ago! These are the ones we took in the Central Arkansas Library on Rock Street. The model is Katy Tipton, and the outfit is compiled from my Fall 2011 Collection.

Wednesday, November 16, 2011
DIY: shredded sweater
I may be a little late on the shredding trend, but I had to do something to this old DKNY gauzy sweater and I thought I'd give it a sort of Rodarte look by shredding it up the back. I took my cue from this video by Childhood Flames. I hope to post it on my etsy store soon.
 |
| I kept the FRONT the same. |
 |
| I cut off the BACK hem and started shredding away. |
Monday, November 14, 2011
same design, different fabric
One of my favorite pieces in my fall 2011 collection was a sort of jacket/cardigan/kimono (I'll call it a "jacket" for the sake of brevity) in a rust-colored floral vintage fabric.


Subscribe to:
Posts (Atom)